Let's cut to the chase. You're here because you want a pie crust that's actually easy to make by hand, without a food processor turning it into a tough mess. I've baked pies for over a decade, and I can tell you—most recipes overcomplicate things. This guide strips it back to basics. You'll get a flaky, tender crust every time, using just your hands, a bowl, and a few simple ingredients. Forget the fear; we're diving in.
What You'll Find in This Guide
Why Hand-Made Pie Crust Beats Machines Every Time
I used to rely on a food processor for pie dough. It was fast, but my crusts often came out dense or overworked. Then I switched to hand-mixing, and the difference was night and day. When you use your hands, you have better control over the texture. You can feel when the fat is just right—pea-sized chunks that melt into flaky layers during baking. Machines tend to chop everything too fine, leading to a crumbly or tough crust.
Another benefit? It's quieter and more satisfying. There's something therapeutic about rubbing butter into flour. Plus, you don't need any fancy gear. If you're short on kitchen space or budget, this method is a game-changer. I've taught this to friends who swore they couldn't bake, and now they're making pies from scratch weekly.
The Exact Ingredients and Tools You Need
Keep it simple. Here's what you'll need for a single 9-inch crust (double it for a double-crust pie).
- Flour: 1 1/4 cups all-purpose flour. Don't use cake flour—it has less protein, which can make the crust too tender and hard to handle.
- Fat: 1/2 cup cold unsalted butter, cut into small cubes. Some recipes use shortening, but butter gives better flavor. If you want extra flakiness, try half butter, half lard.
- Liquid: 3-4 tablespoons ice-cold water. Yes, ice-cold. This is non-negotiable.
- Salt: 1/2 teaspoon. It enhances flavor without making it salty.
- Sugar: 1 teaspoon (optional). I add it for fruit pies to balance acidity.
Tools? A large mixing bowl, a pastry cutter or your fingers, a rolling pin, and plastic wrap. That's it. No stand mixer, no processor. I learned this from an old baker who swore by hand-mixing, and it's stuck with me.
Step-by-Step Process for Perfect Dough
Follow these steps closely. I'll break it down so you know exactly what to do.
Step 1: Combine Dry Ingredients
In your bowl, whisk together the flour and salt (and sugar if using). This ensures even distribution. Many beginners skip this and end up with spotty seasoning.
Step 2: Work in the Fat
Add the cold butter cubes. Use your fingertips or a pastry cutter to rub the butter into the flour. You're aiming for pieces the size of small peas. Don't overdo it—if the butter melts from your hands, pop the bowl in the fridge for 5 minutes. This step is crucial for flakiness. I've seen people rush it and get a crust that's more like a cracker.
Step 3: Add Water Gradually
Sprinkle the ice water over the mixture, one tablespoon at a time. Use a fork to toss it until the dough just comes together. It should look shaggy, not wet. If you squeeze a handful and it holds, stop adding water. Too much water makes the crust tough; too little makes it crumbly. This is where hand-mixing shines—you can adjust on the fly.
Step 4: Form and Rest the Dough
Gather the dough into a ball, flatten it into a disk, wrap it in plastic, and refrigerate for at least 30 minutes. This relaxes the gluten and firms up the butter. Skipping the rest is a common mistake. I once baked a crust immediately, and it shrank so much in the oven it was unusable.
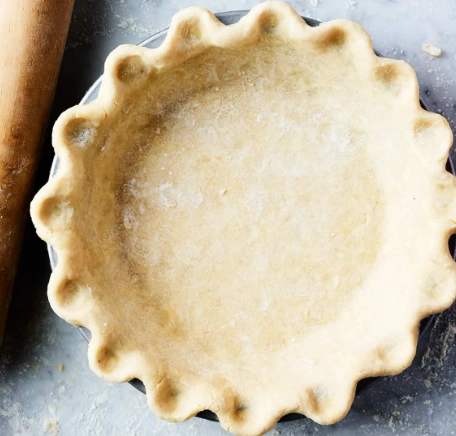
Step 5: Roll and Shape
On a lightly floured surface, roll the dough from the center outward, turning it occasionally to prevent sticking. Aim for a circle about 12 inches in diameter. If it tears, patch it with extra dough—no one will notice after baking. Transfer it to your pie dish, trim the edges, and crimp as desired.
Baking Tips for a Golden Finish
Now, let's talk baking. Whether you're making a fruit pie or a quiche, these tips ensure success.
- Preheat your oven: Always bake at 375°F (190°C) for a standard pie. A hot oven sets the crust quickly, preventing sogginess.
- Use pie weights for blind baking: If your filling is wet, like for a custard pie, blind bake the crust first. Line it with parchment, fill with dried beans or pie weights, and bake for 15 minutes. Then remove the weights and bake another 5 minutes until golden.
- Brush with egg wash: For a shiny top crust, beat an egg with a tablespoon of water and brush it on before baking. It adds color and seals edges.
From my experience, baking times vary. A fruit pie might take 45-50 minutes, while a pre-baked shell for a chilled pie needs only 20. Use your nose—when it smells buttery and looks golden brown, it's done.
Common Mistakes and How to Fix Them
Even pros slip up. Here's what to avoid and how to recover.
- Mistake 1: Warm butter. If your butter softens, the crust won't be flaky. Fix: Chill the dough longer, or freeze it for 10 minutes before rolling.
- Mistake 2: Overworking the dough. This develops gluten, making it tough. Fix: Handle it as little as possible. If you've overmixed, let it rest longer to relax.
- Mistake 3: Not docking the crust. For blind baking, prick the bottom with a fork to prevent air bubbles. I forgot once, and the crust puffed up like a pillow.
- Mistake 4: Ignoring oven placement. Bake on the lower rack for a crisp bottom. Too high, and the top burns before the bottom cooks.
If your crust cracks after baking, don't panic. Fill the pie, and it'll still taste great. Perfection is overrated—flavor matters more.
Your Pie Crust Questions Answered
There you have it—a comprehensive guide to mastering an easy pie crust recipe by hand. It's not about being perfect; it's about enjoying the process and ending up with something delicious. Give it a try this weekend. Mix that dough, feel the texture, and bake a pie that'll impress even you. Happy baking!


Leave a Comment