Let's be honest. A great pie lives or dies by its crust. You can have the most incredible apple filling or the most luxurious chocolate cream, but if the pastry is tough, soggy, or bland, the whole experience falls flat. I've been there—throwing out hockey-puck discs of dough in frustration. But here's the secret I learned over years of trial and (mostly) error: perfect pie dough isn't about magic hands; it's about understanding a few simple scientific principles and having a reliable, repeatable process. Forget the intimidation. This guide will walk you through a classic, all-butter pastry dough that works for any pie, quiche, or tart, and explain the why behind every step.
What You'll Learn in This Guide
The Core Ingredients: More Than Just Flour and Fat
Most recipes just list ingredients. Let's talk about what each one actually does. Getting this right is 80% of the battle.
Flour: The Foundation
All-purpose flour is the standard, and for good reason. Its moderate protein content (usually 10-12%) gives you enough structure without making the crust tough. Bread flour has too much protein (leading to excess gluten), and cake flour has too little (leading to a crumbly mess). Some bakers swear by a mix—like 1/4 cup of cake flour to 1 3/4 cups AP flour—for extra tenderness. It's a good trick, but not essential for your first success.
Fat: The Source of Flakiness and Flavor
This is where the debate heats up: butter vs. shortening vs. lard.
- Butter gives unbeatable flavor and decent flakiness. The water in butter turns to steam during baking, helping to separate the layers. The downside? It softens quickly, making the dough trickier to handle in warm kitchens.
- Vegetable Shortening creates a very tender, easy-to-work crust with superior flakiness because it has a higher melting point. The trade-off? Almost no flavor. Some find it leaves a waxy mouthfeel.
- Lard (rendered pork fat) is the traditionalist's choice. It produces an incredibly flaky, tender crust with a neutral, slightly savory flavor. If you can find high-quality, neutral-tasting leaf lard, it's a game-changer.
My go-to? A hybrid approach. I use mostly butter for flavor, and a small amount of shortening or lard for insurance on tenderness and flakiness. A 2:1 ratio of butter to other fat is perfect.
| Fat Type | Flavor | Texture | Ease of Use | Best For |
|---|---|---|---|---|
| Unsalted Butter | Excellent, rich | Flaky, can be crisp | Moderate (softens fast) | Fruit pies, custard pies |
| Vegetable Shortening | Neutral / Minimal | Very tender & flaky | Easy (stays firm) | Cream pies, hot climates |
| Lard (Leaf Lard) | Neutral, very slight savoriness | Exceptionally flaky & tender | Easy (stays firm) | Savory pies, traditional fruit pies |
| Butter/Shortening Blend | Good buttery flavor | Very tender & flaky | Easy-Moderate | All-purpose, beginner-friendly |
Liquid & Salt: The Binders and Enhancers
Ice-cold water is non-negotiable. Why? Cold water keeps the fat solid. If the fat melts before baking, you lose flakiness. Add it tablespoon by tablespoon. You might not need all of it. The dough should just hold together when pinched.
Salt is a flavor enhancer, not an afterthought. Without it, your crust will taste flat. Use fine sea salt or table salt. If using kosher salt (like Diamond Crystal), use about 1.5 times the volume because it's less dense.
Vinegar or vodka? A teaspoon of apple cider vinegar or white vinegar added to your water can help inhibit gluten development, promising a more tender crust. Vodka (about a quarter cup substituted for some water) works similarly—the alcohol inhibits gluten and evaporates completely during baking. I use vinegar because I always have it. It's a subtle insurance policy.
The Step-by-Step Process: From Bowl to Perfect Disk
Here's my workhorse recipe and method. Read through once before you start.
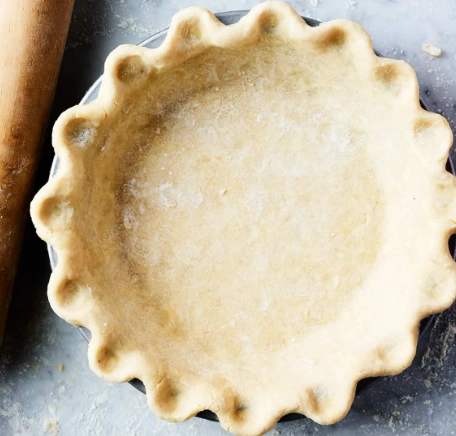
The Foolproof All-Butter Pie Dough (for one 9-inch double-crust pie)
- 2 1/2 cups (315g) all-purpose flour
- 1 teaspoon fine sea salt
- 1 tablespoon granulated sugar (optional, promotes browning)
- 1 cup (2 sticks / 226g) unsalted butter, VERY cold, cut into 1/2-inch cubes
- 1/2 cup (120ml) ice water, plus 1-2 tbsp more only if needed
- 1 teaspoon apple cider vinegar (optional but recommended)
Step 1: Combine Dry Ingredients
Whisk the flour, salt, and sugar (if using) in a large bowl. Some people use a food processor. I often prefer a bowl and a pastry cutter—it gives me more control and prevents over-processing. If your kitchen is warm or you're new to this, the food processor is a great tool. Pulse the dry ingredients a couple times first.
Step 2: Cut in the Fat
This is the critical step. Scatter the cold butter cubes over the flour. Using a pastry blender, two forks, or your fingertips, work the butter into the flour. You're aiming for a mix of sizes: some pea-sized pieces, some flat lima bean-sized shards, and even some smaller crumbs. Those varied pieces of solid fat will melt at different times, creating the layers of flakiness.
Step 3: Add the Liquid
Stir the vinegar into the ice water. Drizzle about half of it over the flour-butter mixture. Use a rubber spatula or fork to toss and moisten. Add more water, a tablespoon at a time, just until the dough begins to clump together when pinched. It will look shaggy and dry in spots. That's fine.
Step 4: Bring It Together & Rest
Dump the shaggy mass onto a clean surface. Using your hands, gently press and knead it 2-3 times just until it forms a cohesive ball. Divide it in two. Flatten each half into a 1-inch thick disk. Wrap tightly in plastic wrap.
Here's the step everyone wants to skip but shouldn't: refrigerate for at least 2 hours, preferably overnight. This allows the gluten to relax (preventing shrinkage) and re-chills the butter. The dough will also hydrate more evenly, making it easier to roll.
Common Mistakes & How to Fix Them Before They Happen
I've made these so you don't have to.
The Dough is Too Crumbly and Won't Come Together
Cause: Not enough water, or the flour wasn't evenly moistened.
Fix: Sprinkle a few more drops of ice water over the dry spots and gently mix. Do this sparingly. Over-watering leads to a tough crust.
The Dough is Sticky and Warm
Cause: The butter melted, either from warm hands, a warm kitchen, or overworking.
Fix: Immediately wrap the dough and chill it for 30 minutes. If it's a disaster, you can re-incorporate a bit more flour after chilling, but the texture might suffer. Prevention is key: work fast and keep everything cold.
The Crust Shrinks Dramatically During Baking
Cause: The gluten was overworked and/or the dough didn't rest enough in the fridge.
Fix: Always give it that full 2-hour chill. When fitting dough into the pie plate, don't stretch it. Gently lift and settle it into the corners. Let the shaped crust chill again for 15-20 minutes before blind baking or filling.
The Dreaded "Soggy Bottom"
Cause: Moist filling meeting unbaked pastry.
Fix: Blind bake (pre-bake) the bottom crust for wet fillings like custard or juicy fruit pies. Use pie weights or dried beans on parchment paper. Also, brush the bottom crust with a thin layer of beaten egg white or melted chocolate before adding a wet filling—it creates a moisture barrier.
Expert-Level Tips & Tricks You Won't Find Elsewhere
These are the nuances that separate a good crust from a great one.
The Freezer is Your Secret Weapon
After cutting the butter, toss it back in the freezer for 10 minutes. Chill your flour bowl, too, if it's a hot day. The goal is to keep the butter below 68°F (20°C) until it hits the oven.
Rolling Without the Struggle
Take your chilled disk out of the fridge. Let it sit for 5-10 minutes to just barely soften—it shouldn't feel rock hard. Roll between two sheets of parchment paper or on a lightly floured surface. Start from the center and roll outward, turning the dough a quarter turn after every few rolls to maintain an even circle. If it cracks at the edges, pinch it together. If it gets sticky, slide it (parchment and all) onto a baking sheet and chill for 10 minutes.
Laminating for Next-Level Flakiness
Want croissant-like layers? After you've cut the butter in but before adding water, dump the mixture onto a surface. Use a rolling pin to press the butter chunks into flat sheets. Scrape it all up, pile it back into a mound, and repeat once or twice. Then return it to the bowl and add water. This "rough puff" technique creates defined, buttery layers.
Baking for Perfection
Always bake your pie on a preheated baking sheet placed on the lowest oven rack. This ensures intense bottom heat to combat sogginess. For a golden shine, brush the top crust with an egg wash (1 egg beaten with 1 tbsp water or cream) and sprinkle with coarse sugar.
Your Pie Dough Questions, Answered
Making pastry dough is a skill, not a mystery. It rewards patience and a bit of science. Start with the hybrid fat recipe, respect the chill time, and don't fear the visible butter. Your first attempt might not be gallery-perfect, but it will be delicious. The second will be better. And soon, you'll be the one people ask for the secret to your flaky, golden pie crust.


Leave a Comment