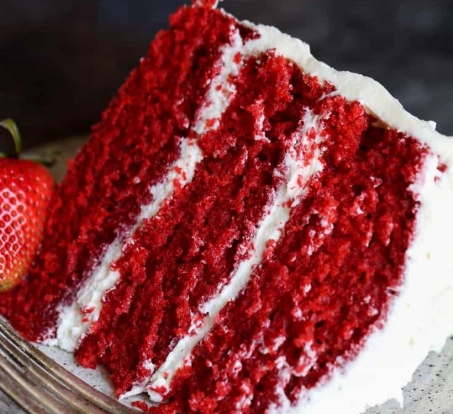
Your cake is baked, cooled, and filled. You're ready for the fun part—decorating. Then you realize it. The piping bag is missing. Or maybe you never owned one. The thought of buying a specialized tool for a single birthday cake feels excessive. I've been there. In my years of baking, both professionally and at home, I've learned that the barrier to beautiful cakes isn't a lack of tools, but a lack of knowing what you can already use.
Throwing your hands up and just slapping on frosting is one option. But there's a better way. You can create stunning, textured, and even intricate designs using items already in your kitchen drawers. This isn't about making do; it's about unlocking a more creative, accessible approach to cake decorating.
What You’ll Find Inside
Your New Decorating Toolbox (The Kitchen Swap)
Forget the specialty store. Your most effective tools are likely within arm's reach. The key is to match the tool to the job you want the piping tip to do. Let's break it down.
| If You Want This Effect… | …Use This Instead | How It Works |
|---|---|---|
| Smooth frosting (like a bench scraper) | A large knife, a rigid plastic card (clean), or a ruler. | Hold the straight edge vertically against the cake and rotate the cake (or move the tool) to smooth the sides. Warm the blade/card in hot water and dry it for a glass-like finish. |
| Swirls & Rosettes (star tip) | The back of a spoon, a small cookie scoop, or a melon baller. | Scoop a small dollop of frosting with the spoon or scoop. Press lightly and lift with a twisting motion to create a peaked swirl or a round rosette. |
| Ridges & Lines (grass tip, lines) | A fork, a cheese grater (fine side), or a clean comb. | Drag the tines of a fork through soft frosting for straight lines. Gently press and pull a fine grater for a fuzzy, textured effect. A comb creates perfect, even grooves. |
| Dots & Scallops (round tip) | The end of a chopstick, a straw, or various measuring spoons. | Dip the end in frosting and dot it onto the cake. Use the rounded bowl of a ¼ tsp or ½ tsp measuring spoon to press perfect, uniform scallops along a border. |
| Writing & Fine Lines (small round tip) | A small zip-top bag, parchment paper cone, or a toothpick. | Snip a tiny corner off a sandwich bag. For more control, roll parchment into a cone. For a guide, use a toothpick to lightly sketch letters, then trace with a thicker tool or sprinkles. |
See? The functionality is all there. A mistake I see beginners make is reaching for a knife for everything. It's the wrong shape for many tasks. Choose the tool based on the impression you want to leave in the frosting.
Master the Foundation: How to Frost Without an Offset Spatula
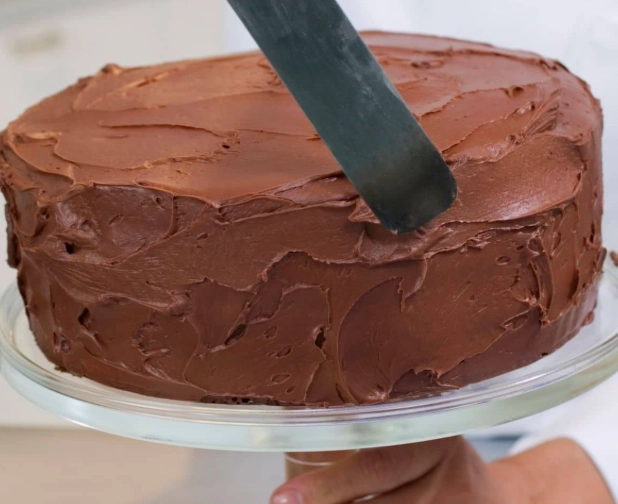
A naked offset spatula is the baker's best friend, but a standard butter knife or a large dinner knife is a worthy understudy. The technique is everything.
First, apply a generous amount of frosting to the top and sides with your knife. This is your "crumb coat"—a thin layer that seals in crumbs. Don't worry about looks. Pop the cake in the fridge for 20 minutes. This step is non-negotiable for clean decorating later.
For the final coat, use the knife like a painter's palette knife. Load the flat of the blade with frosting and spread it on with broad, confident strokes. To smooth it, the trick is warmth and patience. Run your knife under very hot water, wipe it completely dry, and then glide it over the frosting. The heat slightly melts the surface, creating a seamless look. Repeat the heating process for each pass.
Pro Insight: An offset spatula is designed to keep your knuckles off the cake. With a straight knife, you'll have to adjust your grip. Hold it more like a pencil, using your fingers for delicate control, rather than a fist grip which puts your hand in the frosting.
Texture is Magic: Easy Techniques for Visual Impact
Smooth frosting is classic, but texture hides a multitude of sins and adds instant professional flair. It's also where alternative tools truly shine.
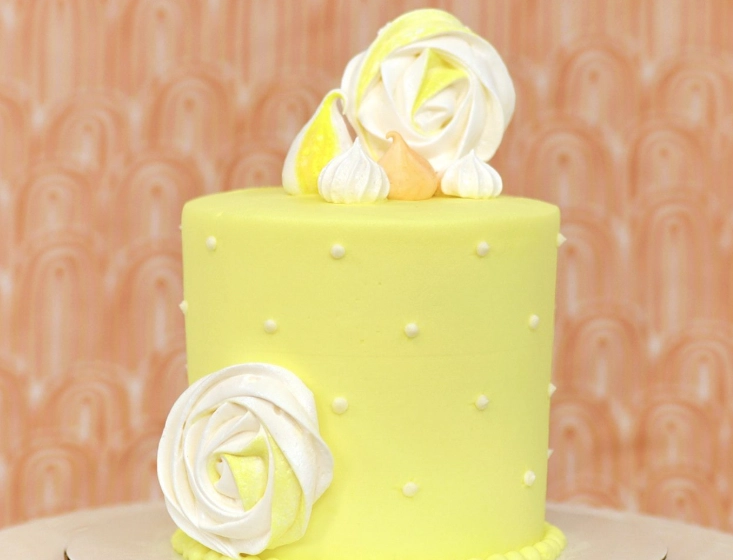
The Rustic Swipe
This is my go-to for beautiful cakes in under a minute. After applying your final coat of frosting, take a small offset spatula or the back of a teaspoon. Hold it against the side of the cake at a slight angle. Slowly turn your cake stand (or rotate around the cake) while keeping the tool stationary. It creates a beautiful, continuous spiral texture. No stand? Just make short, upward swipes all around for a "birch bark" effect.
The Forked Finish
Simple and stunning. Take a standard dinner fork and drag the tines vertically from the bottom of the cake to the top. Go all the way around. You now have elegant, lined texture. For a cross-hatch pattern, do one full set of vertical lines, then another set at a slight diagonal.
The Fluffy Cloud
This works best with a fluffy frosting like Swiss meringue buttercream or whipped cream. Use a fork (or even a whisk) and lightly dab and lift the frosting all over the surface. Don't drag—just poke and lift. It creates a soft, ethereal cloud-like texture that's impossible to mess up.
I once decorated a wedding cake using only a fork and a spoon because my luggage with my tools got lost. The textured finish received more compliments than my usual pristine piping.
Creating Borders and Fine Details
Borders frame the cake. You don't need a star tip to make one.
Scalloped Border: Use the round side of a ½ teaspoon measuring spoon. Press it into the frosting at the base of the cake, lift, and repeat, slightly overlapping each impression. It's foolproof and looks deliberate.
Dot Border: The end of a chopstick, a thick straw, or the handle of a teaspoon is perfect. Dip it in frosting and dot it along the top or bottom edge. For uniform dots, keep a damp cloth nearby to wipe the tool between each dip.
Writing and Lines: The humble sandwich bag is your savior. Spoon frosting into a small zip-top bag, push it down to one corner, and snip a TINY bit off the tip. Start small—you can always cut more. Squeeze gently. Practice on a plate first. If it's too messy, go for the "indirect write" method: use a toothpick to scribe your message, then fill the lines with mini chocolate chips, sprinkles, or edible pearls.
The Final Touch: Strategic Use of Toppings
When in doubt, accessorize. Decorations you place on the cake do half the work.
- Fresh Fruit: A cascade of berries, sliced figs, or citrus wheels. Arrange them in a pattern or pile them artfully in the center.
- Flowers: Edible flowers (like pansies, violets, or nasturtiums) or pesticide-free roses make a breathtaking topper. Press them gently into the frosting.
- The Chocolate Drip: Looks advanced, is simple. Melt chocolate with a little cream, let it cool slightly, then spoon it near the edge of the cooled, frosted cake and gently push it over with the back of the spoon. It drips down naturally.
- Crumb Coatings: Press crushed cookies (Oreos, graham crackers), toasted nuts, sprinkles, or coconut flakes onto the sides of the cake after the crumb coat. It creates a stunning, flavorful crust and covers any imperfections.

A Word of Caution: If using fresh fruit, pat it completely dry. Any moisture will make the frosting run and slide. For a tall pile of berries, add them just before serving.
The Pitfalls to Sidestep (From Experience)
After a decade, I've seen the same issues trip people up. Avoid these, and you're 90% of the way there.
Frosting Consistency is King. This is the #1 rule. Buttercream that's too soft will not hold any texture or detail from your fork or spoon. If your kitchen is warm, chill the frosting for 10-15 minutes before decorating. If it's too stiff and ripping the cake, beat in a teaspoon of milk or cream at a time.
Chill Your Canvas. Trying to add detailed textures or borders to a soft, room-temperature cake is like drawing in the sand during a tide. A 15-minute chill after the final frosting coat firms everything up, making it receptive to your tool impressions.
Clean as You Go. When using the same spoon to make multiple scallops or dots, frosting builds up and changes the shape of your impression. Keep a bowl of hot water and a cloth nearby to wipe your tool clean between each press. It makes a huge difference in uniformity.
The real secret? The best-decorated cake isn't the one with the most technically perfect piping. It's the one that looks delicious, creative, and made with joy. Your kitchen tools are more than capable of delivering that.
Your Cake Decorating Questions, Answered
What can I use instead of a piping bag to write on a cake?
A small sandwich bag with the corner snipped off is the most direct swap. For more control, try a parchment paper cone. If you're after rustic charm, use the back of a spoon to create indentations in the frosting and fill them with sprinkles or colored sugar to spell out your message.
How do you make buttercream borders without a piping tip?
You can create beautiful borders using common utensils. The tines of a fork dragged through soft frosting make a classic ridge. Pressing the rounded edge of a teaspoon or measuring spoon into the frosting creates perfect scallops or dots. For a textured look, use a cheese grater (the fine side) gently over a chilled frosted surface.
What is the biggest mistake when decorating without proper tools?
Using frosting that's too soft or warm. This is the downfall of most DIY decoration attempts. If your buttercream or whipped cream isn't firm enough, it will slump and lose definition. Always chill your cake layers before frosting and consider briefly chilling the frosted cake before adding detailed decorations with alternative tools.
Can I get smooth frosting without a bench scraper or offset spatula?
Absolutely. A large, straight-edged knife (like a bread knife) held vertically can work similarly to a bench scraper. For the top, use a knife or even a rigid card (like a clean, unused credit card) dipped in hot water and wiped dry. The key is multiple light passes, not trying to get it perfect in one go.
Leave a Comment