Let's be honest. The thought of decorating dozens of cupcakes for a party can send even an enthusiastic baker into a mild panic. I've been there – staring at a Pinterest board of impossibly perfect floral cupcakes at 11 PM the night before my kid's birthday, wondering where it all went wrong. But after years of catering events and countless home parties, I've learned a secret: easy cupcake decorating isn't about fancy skills; it's about smart shortcuts and embracing simplicity.
The goal isn't to win a baking competition. It's to create something delightful that makes your guests smile, without you needing a week to recover. This guide strips away the complexity and focuses on what actually works under real-world, time-crunched, maybe-I-only-have-one-bowl conditions.
What's Inside This Guide?
- The First Rule: Shift Your Decorating Mindset
- Your Easy Decorating Toolkit (No Fancy Gear Needed)
- Three Foolproof Decorating Techniques for Beginners
- Party-Ready Theme Ideas in Under 5 Minutes
- The Stress-Free Party Timeline: When to Do What
- The One Decorating Mistake Almost Everyone Makes
- Your Cupcake Decorating Questions, Answered
The First Rule: Shift Your Decorating Mindset
Forget everything you've seen on competitive baking shows. The pressure to create edible art is what makes party dessert prep stressful. Here's the non-consensus view I tell every client: Your cupcakes are a canvas, not a sculpture.
Most tutorials overcomplicate things by starting with intricate piping. That's like learning to paint by starting with the Mona Lisa. We're starting with broad, beautiful strokes.
One major, rarely mentioned mistake? Trying to pipe detailed designs with buttercream that's too soft. Your kitchen is likely warmer than a professional bakery's. If your frosting is sliding off the cupcake, it's not you – it's the temperature. The fix is chilling your frosting for 20 minutes before you start, or using a sturdier base like a cream cheese frosting or even a simple whipped ganache.
Your Easy Decorating Toolkit (No Fancy Gear Needed)
You don't need a suitcase full of tools. This list is curated for maximum impact with minimum investment.
| Tool | Why It's Essential | Cheap Alternative |
|---|---|---|
| Offset Spatula (Icing Knife) | Gives you smooth, professional-looking tops. Far easier to control than a butter knife. | A clean, flexible plastic knife (like a picnic knife). |
| Disposable Piping Bags | For control without the cleanup nightmare of reusable bags. | A sturdy zip-top bag with a corner snipped off. |
| Large Open Star Tip (Like Wilton 1M) | The one tip to buy. Creates instant, gorgeous swirls. | Snip different patterns into the corner of your zip-top bag. |
| Small Scoop or Spoon | For consistently sized sprinkles, candies, or drizzles. | A teaspoon from your drawer. |
| Citrus Zester or Grater | Not for cheese! For delicate chocolate or citrus curls. | Use a vegetable peeler on cold chocolate. |
The real game-changer isn't a tool, but a surface: a lazy Susan or even a small plastic turntable. Spinning the cupcake as you frost with your offset spatula creates a miraculously smooth finish in seconds.
Three Foolproof Decorating Techniques for Beginners
Master these, and you can handle 95% of party themes.
1. The Smooth "Dipped" Top
This is my go-to for a modern, elegant look. Hold the cupcake by its liner, flip it upside down, and gently dip the top into a bowl of frosting. Twist slightly as you lift it out. You get a perfectly smooth, glossy finish. Let the excess drip off, then set it down. It's faster than spreading and looks incredibly uniform. Works best with a slightly thinner, glaze-like frosting or a thick ganache.
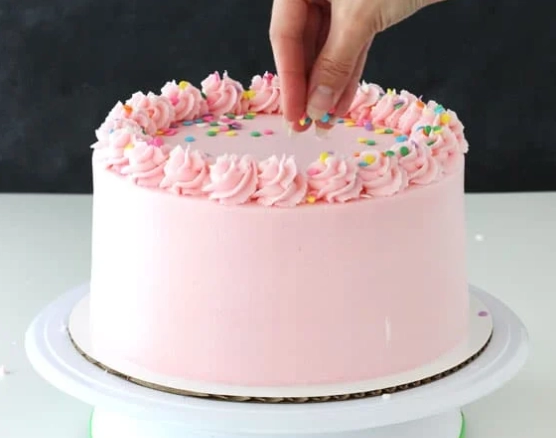
2. The One-Swirl Wonder
Attach your star tip to a piping bag. Hold the bag perpendicular to the center of the cupcake. Squeeze firmly, let the frosting fan out to cover the edge, then pull up in one continuous motion, releasing pressure at the peak. That's it. One swirl. No second layer, no fancy moves. The key is confident pressure. Hesitation creates wobbly, thin swirls. I practiced on a plate first – it saves frosting and builds muscle memory.
3. The "Sprezzatura" Smear
This is the intentionally casual look. Use your offset spatula to dollop frosting in the center. Then, with the spatula almost flat, smear the frosting outwards with a single, swooping motion, leaving some cake visible at the edges and creating lovely peaks and valleys. It looks artistic, not messy. This technique forgives everything and is perfect for rustic or "naked" style cupcakes.
Party-Ready Theme Ideas in Under 5 Minutes
The decoration happens after the frosting. Here’s how to transform a basic swirled or dipped cupcake into a themed masterpiece with minimal effort.
Garden Party: Smooth dipped top with pale green frosting. Immediately press the top into a bowl of crushed Oreo cookies ("dirt"). Add a clean, new plastic flower pick or a single fresh raspberry and a mint leaf.
Under the Sea: Blue swirled frosting. Sprinkle with blue sanding sugar. Add a couple of goldfish crackers and a sour belt candy cut into a wavy "seaweed" strip.
Movie Night: Chocolate smear frosting. Drizzle with a zigzag of melted yellow candy melts ("cheese"). Place one mini pretzel stick and two brown M&M's on top to look like a film reel.
Unicorn Magic: Pastel swirled frosting. While still wet, gently press on a mix of pastel sprinkles and edible glitter. Add a white chocolate chip for the ear and a piece of fondant or a candy horn.
The trick is to use one or two strategic toppings. A confetti cupcake doesn't need sprinkles and nonpareils and glitter. It becomes visual noise. Pick a color scheme and stick to it.
The Stress-Free Party Timeline: When to Do What
This is the logistical blueprint I use. It prevents the last-minute scramble.
2-3 Days Before: Bake your cupcakes. Let them cool completely, then seal them tightly in an airtight container or wrap the whole tray in plastic wrap. They freeze beautifully at this stage for up to a month. Thaw in the container overnight.
1 Day Before: Make your frosting. Store it in an airtight container in the fridge. Prep all your toppings: crush cookies, separate sprinkles into small bowls, cut candy pieces. This is the 15-minute task that saves you an hour of frantic searching on party day.
Morning of the Party: Take frosting out to soften for 30-60 minutes. Set up your decorating station with tools, toppings, and cupcakes. Frost and decorate. Leave them uncovered at cool room temperature until serving. The frosting acts as a seal.
The One Decorating Mistake Almost Everyone Makes
It's not the technique. It's the frosting-to-cupcake ratio.
Too little frosting looks mean. Too much is overwhelming, messy to eat, and can make the cake-to-frosting balance sickly sweet. The sweet spot? For a standard cupcake, aim for frosting that's about as tall as the cupcake itself. For a swirled top, the peak should be no more than 1.5 times the height of the cake. Use a small kitchen scale if you're obsessive – about 1 to 1.5 ounces of frosting per standard cupcake is perfect.
Another subtle error: using the same frosting for filling a piping bag as for spreading. For piping, you need a stiffer consistency that holds its shape. If you're doing both, make your frosting, then set aside a portion to thin out slightly with milk or cream for spreading/dipping.
Your Cupcake Decorating Questions, Answered
 I don't have piping bags or tips. What's the absolute easiest way to make them look nice?
Remember, the best party cupcake is the one that gets eaten with joy, not just photographed. Keep it simple, plan ahead, and don't be afraid to use a store-bought frosting or sprinkle mix to save time. Your guests are there for the celebration and the sweet treat, not to critique your piping skills. Now go make something delicious.

Leave a Comment