I used to think fancy cakes were only for pastry chefs with years of training and a toolkit full of weird gadgets. My "fancy" attempt once involved dumping an entire jar of rainbow sprinkles on a lopsided chocolate cake. It looked like a craft project gone wrong. The truth is, transforming a simple, plain cake into something that looks bakery-level impressive is about smart tricks, not complex skills. You don't need a piping bag or fondant. Often, the most elegant looks come from embracing simplicity and using what you already have in your kitchen.
This guide is for anyone who has baked a perfectly delicious cake only to feel it looks a bit... naked. We're going to move beyond the basic smear of frosting. I'll show you how to create texture, height, and visual interest with techniques that are almost foolproof. Most of these require nothing more than a butter knife, a fork, or some fresh fruit.
Quick Navigation: Your Path to a Prettier Cake
Step Zero: The Non-Negotiable Foundation
Let's get one thing straight. No decoration in the world will save a lumpy, crumbly, or warm cake. This is the step everyone wants to skip, and it's the biggest mistake I see. Your cake must be completely cool. I mean, room-temperature, not-a-hint-of-warmth cool. Frosting a warm cake is like trying to ice a soup—it will melt, slide, and pick up crumbs, creating a messy "crumb coat" you never wanted.
If you have domed tops, level them. Use a serrated knife and saw gently. A flat surface is your best friend for stable stacking and clean frosting lines. For a super smooth starting point, you can do a thin "crumb coat": spread a very thin layer of frosting to trap all the loose crumbs, then chill the cake for at least 20 minutes. This seals the surface. When you apply the final, thicker layer of frosting, it will go on cleanly over this sealed base. It adds 30 minutes to your process but saves you 30 minutes of frustration trying to hide crumbs.
How to Create Visual Interest with Frosting Alone
You don't need color or toppings. The frosting itself can be the star. The goal is to create intentional texture, which catches light and looks far more sophisticated than a perfectly smooth finish (which is actually very hard to achieve).
The Rustic Swirl
This is my go-to, lazy-but-luxurious method. Using an offset spatula or even the back of a spoon, apply your frosting in a thick layer. Then, with the tip of your spatula, press gently into the frosting and make a quick, small circular motion, then lift. Repeat all over the cake, creating a field of little peaks and swirls. Don't overthink it. The irregularity is what makes it beautiful. It works amazingly well with cream cheese frosting or fluffy buttercream.
The Textured Comb
If you have a cake scraper or even a plain plastic card (like an old gift card), you can create stunning linear textures. After applying a semi-smooth coat of frosting, hold your scraper vertically against the side of the cake. Slowly turn the cake stand (or carefully move around the cake) to create clean, vertical lines. For a different look, hold the scraper at a 45-degree angle. You can find simple plastic cake combs with different patterned edges for under $5, and they create designs that look incredibly professional.
The Fork Finish
For a chic, minimalist look, try the fork technique. Do a rustic swirl first to get some texture, then gently drag the tines of a fork through the frosting in long, vertical strokes from top to bottom. This creates elegant, parallel lines that are simple and stunning on a naked or semi-naked cake.
| Technique | Best With | Difficulty | Key Tool |
|---|---|---|---|
| Rustic Swirl | Buttercream, Cream Cheese Frosting | Easy | Offset Spatula or Spoon |
| Textured Comb | Stiffer Buttercream, Chocolate Ganache | Medium | Cake Scraper or Card |
| Fork Finish | All frostings, especially on "naked" cakes | Easy | Dinner Fork |
| Ombre Spatula | Two-tone colored frosting | Medium | Two Spatulas |
How to Use Garnishes Like a Pro (Not Just a Topping)
Throwing a handful of berries in the center is fine, but let's elevate it. Think of garnishes as architecture and color theory, not just flavor.
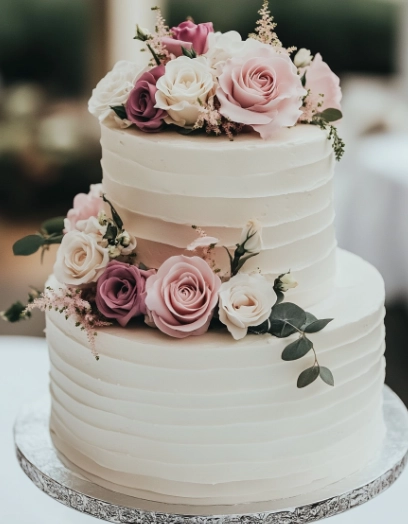
Fresh Fruit: The secret is in the preparation and placement. Don't use wet fruit straight from washing—pat it completely dry. Sliced strawberries, kiwi, or figs create beautiful patterns. Try arranging them in a concentric circle from the outer edge inwards, or in a single, elegant line down the center. For berries, a cascading cluster falling down one side of the cake looks dynamic and intentional, not scattered.
Herbs & Edible Flowers: A single sprig of mint, rosemary, or thyme can transform a simple lemon or chocolate cake. It adds a pop of green and suggests sophisticated flavor pairing. Edible flowers like pansies, violets, or nasturtiums are stunning. Place them sparingly. One or two, with a few leaves, is often more elegant than a blanket of flowers. Always ensure they are pesticide-free and intended for eating.
Chocolate & Nuts: Instead of chocolate chips, make easy curls using a vegetable peeler on a room-temperature chocolate bar. Shards of toasted nuts (like hazelnuts, almonds, or pistachios) add crunch and a gourmet touch. Lightly toast them for maximum flavor, let them cool, then chop roughly. Press them gently into the frosting around the base of the cake or cluster them on top.
Next-Level Combo Moves: Putting It All Together
This is where the magic happens. Combine a texture technique with a strategic garnish.
The Minimalist Elegance: A vanilla cake with a rustic swirl white buttercream. Use the fork technique to drag lines through the swirls. Garnish with a line of perfectly aligned, halved fresh figs and a tiny drizzle of honey right before serving. The texture, the monochromatic color scheme with one focal point, and the glossy honey drizzle scream sophistication.
The Textured Chocolate Dream: A chocolate cake with a textured comb finish on the sides, creating vertical stripes. Keep the top smooth. Pile a modest mound of fresh raspberries in the center, and dust the entire top lightly with edible gold dust or cocoa powder using a fine-mesh sieve. The contrast between the textured sides, the shiny berries, and the delicate dusting is incredible.
The "Naked" Cake Illusion: Do a very thin crumb coat, so the cake layers subtly show through. Use the rustic swirl method on the top edge only. Fill the center of the top with a mix of seasonal berries, edible flowers, and a few mint leaves, letting them spill over slightly. The unfinished sides make the lush top look even more abundant and carefully crafted.
Remember, the goal isn't perfection. It's intention. A few deliberate marks with a fork look artistic. A carefully placed line of fruit looks designed. That's what makes a cake look fancy—the clear evidence of a thoughtful hand.


Leave a Comment