Let's be honest. The first time I tried making macarons, it was a disaster. Lopsided, cracked, sticky messes that looked nothing like the elegant pastries in Parisian patisserie windows. I felt defeated. Maybe you've been there too, scrolling through perfect pictures online, wondering what secret club you need to join to get it right.
Here's the truth they don't always tell you: macarons are finicky, but they're not magic. The "secret" is just a handful of non-negotiable techniques. This guide strips away the intimidation. We'll walk through a simple, tested formula and focus on the why behind each step. By the end, you'll understand the process, not just follow a recipe blindly.
Your Quick Macaron Roadmap
Gear Up: The 6 Essential Tools You Actually Need
You don't need a professional kitchen. But skipping these tools is asking for trouble.
- A digital kitchen scale. This is non-negotiable. Volume measurements (cups) for powdered ingredients are wildly inaccurate. A $20 scale is your single best investment for baking consistency. The National Institute of Standards and Technology (NIST) emphasizes the importance of precise measurement in reproducible results, and that applies directly to baking science.
- A fine-mesh sieve. For sifting your almond flour and powdered sugar together. Lumps are the enemy of smooth shells.
- A reliable hand mixer or stand mixer. You need to whip the meringue to stiff, glossy peaks. A whisk and strong arms aren't consistent enough.
- Flexible silicone spatulas. For folding the batter (macaronage) gently. Stiff spatulas crush air bubbles.
- Piping bag and a round tip (about 1/2 inch). Disposable bags are fine. The round tip gives you control over the size and shape.
- Good quality baking sheets. Light-colored aluminum sheets are best. Dark sheets can over-brown the bottoms. You'll also need parchment paper or a silicone macaron mat. Mats have guides for even sizing, but parchment works perfectly.
See? No crazy gadgets. Just precise tools.
The Short & Sweet Ingredient List
The simplicity is beautiful. For about 30 macaron shells (15 assembled cookies):
- 100g egg whites (about 3 large eggs), aged*
- 100g granulated sugar
- 105g almond flour (blanched, super-fine)
- 105g powdered sugar (icing sugar)
- Gel food coloring (optional)
- 1/4 tsp cream of tartar (optional but helpful)
*Aging egg whites: This is one of those "secret" tips that works. Separate the eggs 1-2 days ahead, cover the whites loosely, and refrigerate. Let them come to room temperature before using. Aging reduces water content and makes the meringue more stable. If you're impatient, using fresh room-temperature whites works, but aged are more forgiving.
Now, about almond flour. This is where many beginners go wrong without knowing it. Don't just grab any bag. You need blanched, super-fine almond flour, not almond meal. Meal has the brown skins and is coarser, leading to grainy, speckled shells. Brands like Bob's Red Mill (the one in the blue bag, not the red) or a specialty brand work well. Sift it without fail.
The Foolproof Step-by-Step Method
We're using the French meringue method. It's the most straightforward for beginners.
Step 1: Prep and Sift (The Dry Team)
Weigh your almond flour and powdered sugar. Sift them together through that fine-mesh sieve into a large bowl. If you have a few coarse almond bits left in the sieve, you can discard them (about a teaspoon max). This ensures your dry mix is lump-free and airy. Set this bowl aside.
Step 2: Whip the Meringue (The Wet Team)
In a scrupulously clean, dry mixing bowl, add your room-temperature egg whites. Whip on medium speed until foamy. Add the cream of tartar (it stabilizes the foam). Then, with the mixer running, very slowly rain in the granulated sugar, about a tablespoon at a time.
Increase speed to medium-high and whip until you get stiff, glossy peaks. This is critical. The meringue should stand straight up when you lift the beaters. It should look like shaving cream, not droop at all. If using gel coloring, add it in the last 30 seconds of whipping.
Common Pitfall: Under-whipped meringue is the #1 cause of flat, spread-out macarons. Don't be scared. It should be very stiff. If you think it's done, whip for another 30 seconds.
Step 3: Macaronage (The Magic Fold)
Add about one-third of your sifted dry ingredients to the meringue. Using a flexible spatula, fold and press the mixture against the side of the bowl to combine. It will look shaggy and dry. Add the remaining dry ingredients in two more batches.
Now, the crucial part: continue folding until the batter transforms. It will go from thick and clumpy to slowly flowing off the spatula in a thick, lava-like ribbon. When you can draw a figure-eight with the batter dripping off the spatula and the ribbon slowly melts back into itself in the bowl, STOP. This takes about 30-50 folds. Over-mixing makes the batter too runny; under-mixing makes it too thick and prone to cracking.
Step 4: Piping and Resting
Fit your piping bag with the round tip. Fill it with the batter. Pipe 1.5-inch circles onto parchment-lined baking sheets, holding the bag straight up and down. Give it a little swirl at the end to minimize the peak. They will spread a bit.
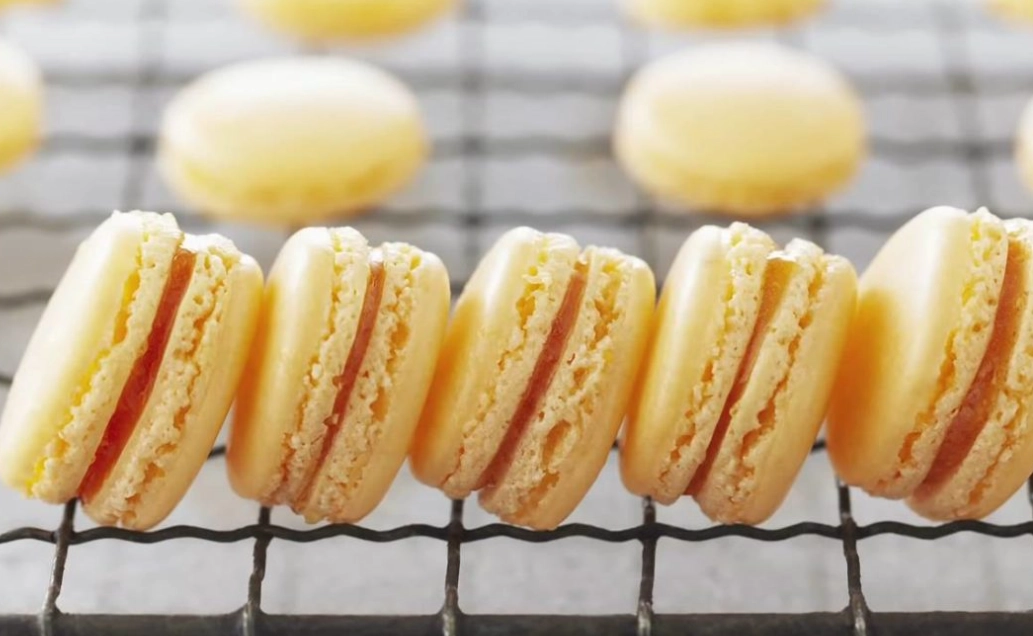
Here's the step everyone wants to skip: RESTING. Tap the baking sheet firmly on the counter 3-4 times to pop any large air bubbles. Let the piped shells sit at room temperature for 30 to 60 minutes, until you can gently touch the surface and no batter sticks to your finger. A dry skin forms. This skin is what traps steam underneath during baking, forcing the iconic "feet" to puff out.
Baking, Cooling & The Ultimate Troubleshooting Guide
While the shells rest, preheat your oven to 300°F (150°C). Use an oven thermometer if you can—oven dials are often wrong.
Bake one sheet at a time in the center rack for 15-18 minutes. They are done when they don't wiggle on their feet when gently nudged.
Let them cool completely on the baking sheet before trying to remove them. They'll release easily from parchment when cool.
So what if they don't look perfect? Let's diagnose it.
| What You See | Most Likely Cause | How to Fix It Next Time |
|---|---|---|
| Cracked tops | Under-mixed batter, or shells didn't rest long enough to form a skin. | Mix a bit longer to the lava stage. Ensure the surface is completely dry to the touch before baking. |
| No feet / Flat macarons | Over-mixed batter (too runny), oven temp too low, or insufficient resting skin. | Stop mixing sooner. Verify oven temp with a thermometer. Ensure a proper dry skin forms. |
| Hollow shells | Over-whipped meringue, under-mixed batter, or oven temp too high. | Whip to stiff peaks, not beyond. Ensure proper macaronage. Try lowering oven temp 10°F. |
| Lopsided / Slanted feet | Uneven oven heat, or baking sheet warped. | Rotate the pan halfway through baking. Use a heavy-duty, flat baking sheet. |
| Sticky bottoms | Under-baked. | Bake 1-2 minutes longer until they don't move on their feet. |
Don't get discouraged by a flawed first batch. It's a diagnostic tool. My third batch was when it all clicked.
Filling Ideas and How to Store Them Right
Pair your shells! Match them by size. Now for the fun part.
Simple Buttercream: Whip 1/2 cup softened butter until pale. Gradually add 1 1/2 cups powdered sugar and 1 tsp vanilla. Whip until fluffy. Add a pinch of salt.
Easy Ganache: Heat 1/2 cup heavy cream until simmering. Pour over 4 oz chopped dark chocolate. Let sit 5 minutes, then stir until smooth. Cool until spreadable.
Store-Bought Shortcut: A high-quality jam or lemon curd works beautifully.
Pipe or spread filling onto the flat side of one shell and sandwich with another. Don't overfill.
Storage is key: Macarons taste better the next day! This "maturation" lets the shells soften and absorb flavor from the filling. Store them in an airtight container in the fridge for up to 5 days, or freeze for 3 months. Bring to room temperature before serving for the best texture and flavor.
Your Macaron Questions, Answered
 There you have it. A detailed map for your first—or next—successful batch of macarons. It's a process of precision, not mystery. Weigh your ingredients, whip that meringue stiff, master the fold, and be patient with the rest. The moment you peel a perfect, footed shell off the parchment is incredibly satisfying. Go on, give it another shot. You've got this.
Leave a Comment