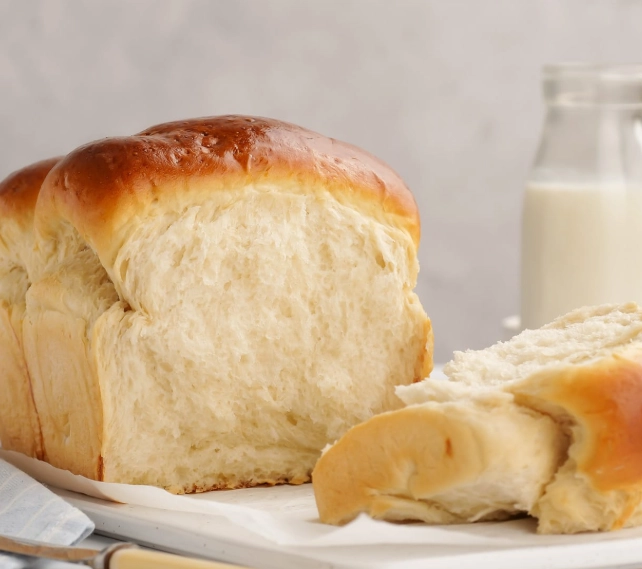
You pull the loaf from the oven. It looks golden, it smells divine. But when you tear into it, you're met with a dense, chewy crumb. It's edible, sure, but it's not the cloud-soft, featherlight bread you dreamed of. That disappointment? I've been there. After a decade of baking (and more than a few doorstops), I've learned that softness isn't an accident. It's a series of deliberate choices, from the flour you pick to how you handle the dough. Let's break down exactly how to make bread soft with yeast, for good.
Your Quick Guide to Softer Bread
Understanding the Science of Soft Bread
Think of bread as a sponge. A soft bread is a sponge with millions of tiny, thin-walled air pockets held together by a flexible, tender network. That network is gluten. The air comes from yeast fermentation. The tender part? That's where technique and ingredients come in.
Gluten development is a double-edged sword. You need enough to trap the gas from the yeast and give the bread structure. But too much, or gluten that's too strong and tight, and your bread becomes tough and chewy. The goal is a well-developed but relaxed gluten network. It should be able to stretch thin without snapping (that's the "windowpane test"), allowing the dough to expand dramatically during the final rise and oven spring.
Key Insight: Softness is about moisture retention and delayed staling. Fats and sugars don't just add flavor; they physically interfere with the starch molecules, keeping them from crystallizing and turning your bread hard. That's why enriched doughs (with milk, butter, eggs) stay softer longer than a lean French baguette.
The Ingredients That Build Softness
Every ingredient plays a role. Swapping one can change the entire texture.
Flour: The Foundation
Bread flour is your best friend for soft bread. Its higher protein content (usually 12-14%) creates more gluten than all-purpose flour. More gluten might sound counterintuitive for softness, but remember, we want a strong yet elastic network. Bread flour gives you the strength to trap more air, leading to a higher, lighter loaf. All-purpose flour works, but the results are often slightly denser.
The Softening Agents: Fats and Dairy
This is the secret weapon. Fats like butter, oil, or eggs coat the gluten strands, literally shortening them (that's where "shortening" comes from). This lubrication prevents the gluten from forming a tight, tough network. It results in a more tender, cake-like crumb.
Using milk instead of water does two things. First, the milk fats act as a softener. Second, the milk sugars and proteins promote browning and contribute to a softer crust. Scalding the milk (heating it to just below a boil then cooling) deactivates an enzyme that can weaken dough, making it a pro move for guaranteed softness.
Sugar: Not Just for Sweetness
Sugar is hygroscopic – it attracts and holds moisture. A couple of tablespoons in your dough helps the bread retain water, keeping it soft. It also feeds the yeast for a robust rise. Don't overdo it, or you'll slow the yeast down.
| Ingredient | Role in Softness | Pro Tip |
|---|---|---|
| Bread Flour | Builds strong, elastic gluten to trap maximum air. | Don't substitute with cake flour. The low protein won't support the rise. |
| Butter or Oil | Coats gluten strands, tenderizing the crumb and retaining moisture. | Use room-temperature butter for even incorporation. Oil makes a slightly more even crumb. |
| Milk (liquid) | Adds fat, sugar, and proteins for a softer crust and crumb. | Scald and cool it for best results and to avoid dough-weakening enzymes. |
| Eggs | Rich in emulsifiers and fat, they create an incredibly tender, yellow crumb. | Common in brioche and challah. Adds richness and extends freshness. |
| Sugar/Honey | Retains moisture, feeds yeast, and contributes to a tender brown crust. | 1-2 tbsp is usually enough. Honey adds flavor and extra moisture retention. |
The Step-by-Step Process for Soft Bread
Technique is where the magic happens. You can have perfect ingredients and ruin them with rushed handling.
1. Mixing and the Autolyse (The Secret Rest)
Before you even add yeast or salt, try this: mix your flour and water (or milk) roughly and let it sit for 20-30 minutes. This is called autolyse. It allows the flour to fully hydrate and gluten strands to start forming naturally. When you later add yeast and salt and start kneading, the dough comes together faster, is less sticky, and develops a better, more extensible gluten network. It's a game-changer for texture.
2. Kneading: The Goldilocks Zone
Under-knead, and the gluten is too weak to hold gas. Over-knead, and you create a tense, overworked network that tears easily and bakes up tough. The goal is smooth, elastic dough that passes the windowpane test. For most stand mixers, this is 8-10 minutes on medium-low speed. By hand, it might be 12-15 minutes of rhythmic folding and pushing.
Watch Out: A common subtle mistake is adding too much flour during kneading because the dough is sticky. Resist! A slightly tacky dough often bakes up lighter. Use wet hands or a bench scraper instead of dumping in more flour, which can make the bread dry and dense.
3. The First Rise (Bulk Fermentation): Flavor and Gas
Let the dough double in size in a lightly oiled bowl, covered. This isn't just about volume. This is where flavor develops as yeast produces acids and alcohol. A slow, cool rise (even overnight in the fridge) creates deeper flavor and a more relaxed dough. Patience here builds character.
4. Shaping and the Second Rise: The Critical Final Rest
After you punch down and shape the loaf, it needs a second rise. Do not skip this. Shaping tenses the gluten again. This final proof allows it to relax and fill with gas one more time. If you bake it now, the tense gluten will resist oven spring, and your bread will be dense. It should look puffy and hold a gentle indent when lightly pressed.
5. Baking for a Soft Crust
For a soft crust, you want to limit moisture loss. Bake in a loaf pan, which supports the sides. You can also tent the loaf with foil for the last 10-15 minutes of baking. Brushing the top with melted butter right when it comes out of the oven gives you that classic, soft, bakery-style crust.
Common Mistakes and How to Fix Them
Let's troubleshoot the usual suspects.
- Dense, Heavy Loaf: Likely under-proofed (didn't rise enough) or the yeast was dead (liquid too hot). Check yeast freshness with "proofing" in warm water with a pinch of sugar. Ensure your final shaped loaf has truly doubled before baking.
- Bread is Tough/Chewy: Over-kneading or using too much flour. Next time, stop kneading sooner and measure flour by weight, not volume, for accuracy.
- Crumbly, Dry Texture: Too much flour or not enough fat/liquid. Your dough should be tacky, not bone-dry. Enrich your dough with a bit of butter or an egg.
- Hard Crust (when you wanted soft): Baked uncovered at too high a temp or without steam. Use a loaf pan, tent with foil, and brush with butter post-bake.

Your Soft Bread Questions Answered
The journey to soft bread is part science, part feel. Start by following a trusted recipe for a basic sandwich loaf—like the classic ones from King Arthur Baking—that includes milk and a bit of fat. Pay attention to the dough, not just the clock. Is it smooth? Does it spring back slowly? That tactile feedback is your best guide. Remember, every bake teaches you something. Even my less-perfect loaves made great toast. Now, go preheat that oven.

Leave a Comment